Introduction
A cracked, stained, or uneven concrete driveway doesn't automatically mean a full tear-out and repour. Grinding can strip away the damaged top layer and leave you with a flat, safe surface for a fraction of the cost.
But results vary a lot. The concrete's hardness, the grinder you rent, the grit sequence you follow, and how steady your hand stays on the machine all shape the outcome. Rush the job or skip a grit stage, and you'll end up with gouges, swirl marks, or a driveway that looks worse after grinding than it did stained.
This guide covers the full process: what to check before you start, the step-by-step grinding sequence, the gear you actually need, when grinding isn't the right call, and the mistakes that trip up most first-timers.
Key Takeaways
- Clears trip hazards and stains for far less than full replacement; local rental quotes beat national averages
- Coarse-to-fine grit progression and a steady walking pace make or break the finish
- DIY suits patios, edges, and small slabs; full driveways or structural unevenness usually need a pro
- Permanently thins the slab—a cosmetic fix you can't repeat indefinitely
- Silica dust is a real respiratory hazard—PPE and dust containment aren't optional
How to Grind a Concrete Driveway: Step-by-Step Guide
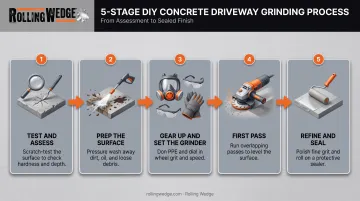
Step 1: Test and Assess the Driveway
Run a Mohs scratch-test kit over the surface to gauge hardness. This tells you which grit pad to start with, since softer concrete chews up fast under a coarse pad while harder slabs need it just to cut at all.
- Check raised or sunken sections with a straightedge; shallow wear is a good grinding candidate
- Flag offsets approaching an inch or more—those usually mean settling or a void underneath, not a grinding fix
- Mark cracked, raised, and stained zones with chalk or spray paint so each pass targets the right spot
Step 2: Prep the Surface
Pressure-wash the entire driveway first. Oil, dirt, old sealer, and coatings clog diamond pads fast and cut pad life short.
- Fill cracks and holes with epoxy or concrete filler and let it cure fully per the label—grinding over uncured filler smears it across the slab
- Build your dust-containment setup before you start: a grinder shroud connected to a HEPA-rated wet/dry vacuum
Step 3: Gear Up and Set the Grinder
Full PPE, every time: safety glasses or goggles, ear protection, an N95/P100 respirator, and gloves.
- Attach the coarsest diamond pad that matches the hardness rating from Step 1
- Drop the grinder's rotation speed for coarse pads on hard concrete so the teeth bite instead of skipping
Step 4: Make the First Pass
Work in overlapping, methodical passes with the grinder head flat against the slab. Tilting it, even slightly, gouges the surface.
- Keep a steady walking pace. Too slow cuts too deep in one spot; too fast leaves the surface uneven
- Switch to a handheld edge grinder for corners, borders, and the strip along the garage wall the main machine can't reach
- Overlap each pass by a few inches to avoid faint ridge lines between rows
Step 5: Refine with Finer Grits and Finish
Vacuum every bit of debris before changing pads. Leftover grit from the last pass will scratch the new one on contact.
- Move to a medium pad, then a fine pad, running a full pass with each
- Run a hand over the surface periodically; rough patches or swirl marks mean another pass before you're done
- Once clean and dry, apply a concrete sealer to protect the freshly ground surface from stains and moisture
What You Need Before Grinding Your Concrete Driveway
Having the right equipment and site conditions ready up front saves you from a mid-job scramble, or worse, a ruined pad and a redo.
Equipment and Tools
- Walk-behind concrete grinder (typically a day rental) for the main surface, plus a handheld edge grinder for corners
- Diamond grinding pads in coarse, medium, and fine grits, matched to your concrete's hardness
- Grinder shroud and HEPA-rated wet/dry vacuum for dust containment
Rental rates vary widely by region and rental company. Skip the national averages and get a same-day quote from your local yard instead.
Site Conditions and Safety Readiness
- Clean, dry driveway free of oil, sealer, and old coatings
- Epoxy filler on hand for cracks and holes before you grind
- Full PPE: eye and hearing protection, N95/P100 respirator, gloves, and closed-toe boots
- Check local dust and slurry rules—many municipalities ban concrete slurry and wash water from entering storm drains
Is Grinding the Right Fix, or Should You Consider an Alternative?
When Grinding Makes Sense
Grinding works well for shallow trip hazards, oil stains, spalled or scaled patches, and surface prep before resealing or coating. Skip it when the problem runs deeper or the job gets too large.
- Deep structural cracks or settling from voids, erosion, or tree roots — grinding treats the symptom, not the cause
- Multiple large driveways or full-slab removal — a rented walk-behind handles one driveway fine, but turns slow and labor-intensive at that scale
When to Consider an Alternative Instead
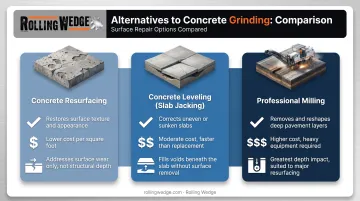
Three situations call for a different approach entirely.
Concrete Resurfacing
When it's better: The driveway is structurally sound but cosmetically worn, faded, or unevenly colored.
Key trade-offs: Costs more upfront than a DIY grind. Basic overlays run roughly $3 to $7 per square foot, according to Concrete Network's 2020 pricing data, but the result is a uniform, renewed surface without touching slab depth.
Concrete Leveling (Slab Jacking)
When it's better: Unevenness comes from settling, voids, or erosion rather than surface wear, which means it fixes the cause instead of grinding down the symptom.
Key trade-offs: Residential leveling projects typically run $750 to $6,000 or more, per benchmarks published by A-1 Concrete Leveling, but it avoids the slab-thinning that repeated grinding eventually causes.
Professional Milling for Large-Scale or Contractor-Grade Projects
When it's better: Full driveway removal, municipal or commercial-scale jobs, or rebar-reinforced concrete where a handheld grinder stalls out.
Key trade-offs: Requires mechanized milling equipment and a trained operator - not a rented grinder and not a DIY job.
This is where a rented driveway grinder stops being the right tool. Contractors and municipalities working at that scale turn to mechanized milling drums mounted on skidsteers or large-format milling machines. Operating that equipment requires hands-on knowledge of skidsteer operation and milling technique - this is professional territory.
Rolling Wedge supplies Milling Tools to contractors and milling professionals. To be clear: Rolling Wedge is a tool manufacturer, not a milling service provider. They make the Milling Drums and Milling Tools that upgrade existing skidsteer planers and milling machines - contractors do the work.
Their tools are built around a rolling-wedge-lifting action rather than the repeated hammering that carbide picks rely on. The tools roll and rotate across the surface at a set contact angle, putting the material into tension. Concrete's tensile strength runs at roughly 20% of its compressive strength, so wedging into it takes less resistance than fighting compressive force head-on.
That design gives contractors a smoother, lower-bounce cut plus measurable job-site advantages:
- Cuts through rebar, wire mesh, and mixed asphalt-and-concrete surfaces in a single pass without jamming
- Needs tool replacement every 1 to 3 months versus twice a week for standard carbide picks
- Swaps a full 24-inch drum in about 20 minutes instead of 1 to 2 hours
For a single residential driveway, none of this applies - a weekend with a rented grinder is the right call. For contractors already running skidsteer equipment, or those looking to add milling work to their business, Rolling Wedge Concrete Milling tools are worth a closer look. If you have skidsteer experience and are exploring what it takes to get into milling, reach out to Rolling Wedge - they work with contractors at all experience levels and can walk you through the tools and what to expect.
Common Mistakes and Troubleshooting While Grinding
Most grinding problems trace back to a few avoidable habits. Catch these early and you protect the slab, your pads, and your lungs.
- Skipping the grit progression. Jumping straight to a fine pad, or dropping medium altogether, leaves visible swirl marks and an inconsistent surface.
- Moving too fast or tilting the head. Either one causes gouges, low spots, and uneven wear across the slab.
- Ignoring dust containment. OSHA sets an 8-hour permissible exposure limit of 50 micrograms per cubic meter for respirable silica, with an action level of 25 micrograms. Proper PPE and vacuum systems are the standard, not a suggestion.
- Grinding over old debris. Leftover grit from a previous pass acts like sandpaper under the machine and scratches the surface you just finished.
- Pushing through chatter or skip. A chattering or skipping grinder usually means a worn pad or a speed setting that doesn't match the concrete's hardness. Stop and adjust before you continue.
Conclusion
Grinding a concrete driveway works best when the damage is shallow, the prep is thorough, and you follow the grit progression instead of rushing toward a finish. Most failed DIY jobs trace back to the same three things:
- Skipped prep
- Skipped grits
- Skipped safety gear
If your driveway fits that shallow, cosmetic profile, a weekend with a rented grinder and the right pads will get you there.
Structural settling, deep cracking, or work spanning more than one driveway is a different job—grinding alone won't cut it. Resurfacing, leveling, and contractor-grade milling equipment are worth pricing out instead.
Match the method to the driveway's condition, scale, and budget. That way you don't pay twice for the same fix.
Frequently Asked Questions
How much does it cost to grind a concrete driveway?
DIY rental and professional grinding rates vary too much by region and duration for a reliable nationwide average. Professional resurfacing runs about $3–$7 per square foot; for grinding, get a same-day quote from a local rental yard.
Can you grind down 2 inches of a concrete driveway?
Generally, no. Removing that much material risks seriously weakening the slab, especially if it brings you close to rebar or wire mesh. Anything beyond shallow, cosmetic depth should get a structural assessment first.
Is it better to grind or sand a concrete driveway?
Sanding, or hand grinding, works well for small spot repairs, tight corners, and edges. A full-size grinder is the better call for the broad, flat expanse of an entire driveway.
Is it worth resurfacing a concrete driveway?
If the slab is structurally sound but cosmetically worn or unevenly colored, yes. Resurfacing delivers a uniform new surface without altering slab depth, though it costs more upfront than a DIY grind.
Is it better to grind concrete wet or dry for a driveway?
Dry grinding with a shrouded vacuum system suits most homeowner jobs since it skips slurry disposal. Wet grinding suppresses dust well but creates wastewater that many municipalities restrict from entering storm drains.
How long does it take to grind a concrete driveway?
It depends on the driveway's size, the concrete's hardness, and how many grit passes you need. A single-car driveway with sound concrete might take a full day; larger or harder surfaces take longer.