Here's the problem: many homeowners and even some contractors assume millings harden on their own once they're dumped and spread. That's not how it works. Hardening isn't automatic, and it isn't guaranteed just because the material used to be a road.
The results depend on a handful of variables — millings quality, base preparation, compaction method, and cure time. Skip any of those, and you end up with a driveway that stays loose, ruts under tires, and never really "sets."
This guide walks through the exact steps to harden millings correctly, what you need before you start, the factors that most affect the outcome, and the mistakes that ruin an otherwise good installation.
Key Takeaways
- No chemical "hardener" exists: screening, emulsion, thickness, and compaction do the work
- Millings firm up in 24-48 hours, then keep strengthening for weeks under traffic
- 2-4 inches of compacted thickness plus enough roller passes drive long-term stability
- Most failures trace back to skipped base prep, under-compaction, or poorly screened material
How to Harden Asphalt Millings for a Driveway
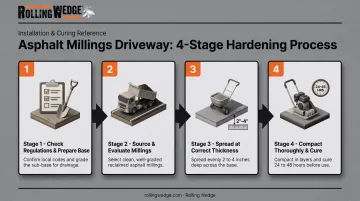
Step 1: Check Regulations and Prepare the Base
Before anything gets delivered, confirm local codes and HOA rules actually permit asphalt millings. Some municipalities restrict recycled asphalt for aesthetic or drainage reasons, and finding out after the truck arrives is a costly mistake.
Once you're cleared to proceed, grade the site so water runs off instead of pooling. The Washington Asphalt Pavement Association recommends a minimum 2% slope for driveway surfaces, roughly a quarter-inch of drop per foot (a benchmark that applies just as well to millings as it does to hot mix).
Build the base in this order:
- Compact the subgrade soil uniformly with a drum roller
- Let it settle for several days before adding anything on top
- Add a coarse gravel base layer to provide stable support underneath the millings
Skipping this step is the single most common reason driveways built with millings fail later.
Step 2: Source and Evaluate the Right Millings
Not all millings are created equal, and this step determines almost everything that happens later. Confirm with your supplier that the material has been screened so no fragment exceeds about two inches — oversized chunks should be crushed down before delivery.
Ask about emulsion content, too. Suppliers typically blend in roughly 2.5-3% emulsion for coarse material and 3-3.5% for fine material to bind the mix into a workable cold-mix asphalt. Federal Highway Administration data on reclaimed asphalt pavement puts typical asphalt cement content in the 3-7% range, with processed material generally sized at 1.5 inches or smaller. Use that range as a reference point when you evaluate a supplier's stockpile.
The quality of the original milling process matters more than most people realize. Cleaner, more consistent cuts produce feedstock with fewer oversized chunks and less embedded debris, so the material screens and blends more predictably.
Some contractors have moved from traditional carbide-pick drums to rolling-wedge tooling for that reason. Rolling Wedge Asphalt Milling tools use a rolling-wedging-lifting action that lifts material away instead of hammering it, which yields more uniform, cleaner millings. If you're buying from a contractor, ask what equipment produced them.
Step 3: Spread the Millings at the Correct Thickness
For residential driveways, a compacted thickness of 2-4 inches is the standard target. This is the direct answer to "how thick should asphalt millings be laid?"
You have two practical spreading methods:
- Paver or spreader — even distribution, best for larger jobs
- Bobcat with hand-shoveled edges — the common DIY approach for smaller driveways
Layer thickness isn't arbitrary. A thinner layer only works as a base course under something else. Anything carrying regular vehicle traffic needs the thicker end of that range to hold up. FHWA guidance on cold-mix pavement lifts recommends keeping dense-graded lifts to around 3 inches where practical, which is why thicker sections often go down in two passes rather than one.
Step 4: Compact Thoroughly and Let It Cure
Compaction is where loose millings actually turn into a driveway. The standard sequence:
- Initial pass with a heavy pneumatic-tired roller to seat the material
- Follow-up pass with a vibratory steel-drum roller, kept wet to prevent the mix from sticking
- Edge shaping — build a slight 45-degree slope along the edges to encourage runoff instead of pooling
A millings driveway usually firms up enough for light foot traffic within 24-48 hours. Full strength builds over the following days and weeks, driven largely by vehicle traffic and weather. Cold slows the process; warm weather speeds it up.
Once compacted, a chip seal or thin asphalt topcoat can go over the surface for a harder, dust-free finish. It isn't required, but it extends driveway life and cuts down on loose gravel tracking into the garage.
What You Need Before Hardening Millings
Preparation influences the final surface more than anything you do after installation. Get these pieces lined up before the first truckload arrives.
Equipment and Machinery
At minimum, you'll need:
- A pneumatic-tired roller for initial compaction passes
- A vibratory steel-drum roller to lock in final density
- A spreader or paver for larger jobs (a skidsteer works for smaller DIY projects)
Materials and Inputs
Have these on hand before the millings arrive:
- Properly screened millings with correct particle sizing
- The right emulsion percentage for your material (coarse vs. fine)
- A coarse gravel base layer
- Edge restraint (timbers, stone, or metal edging) to keep material from spreading laterally
Skill, Safety, and Compliance Readiness
Running heavy compaction equipment safely takes real operator experience. Rollers are heavier and less forgiving than they look.
Before work begins, confirm your drainage design holds up and that any required local permitting is squared away.
Key Factors That Affect How Well Millings Harden
Even with good materials, a few controllable variables decide whether millings set into a stable surface or stay loose underfoot.
| Factor | Why It Matters | Impact on Results |
|---|---|---|
| Emulsion ratio | Fine vs. coarse material needs different binder percentages | Too little emulsion leaves a crumbly, dusty surface that never bonds |
| Compaction passes | Density from rolling locks aggregate and binder together | Under-compaction causes soft spots, ruts, and premature loosening |
| Layer thickness | Must match expected vehicle load and traffic frequency | Too thin cracks under weight; too thick slows curing and traps moisture |
| Weather/temperature | Cold slows emulsion breaking; heat keeps the mix soft longer | Installing outside the ideal window extends time before regular use |
Two factors deserve extra attention. Compaction is non-negotiable. Density is what physically binds the aggregate together, and there's no shortcut around enough roller passes.
Temperature also matters more than most people expect. Installing millings in cold weather doesn't ruin the driveway, but you will wait longer before treating it like a finished surface.
Common Mistakes and Troubleshooting Tips
Most asphalt millings driveway problems come from a handful of avoidable errors:
- Skipping base prep or drainage grading: Soft spots, erosion, and long-term instability. Fix: regrade and compact the subgrade before adding millings.
- Using unscreened millings or the wrong emulsion percentage: Crumbly, dusty surface that won't bond. Fix: confirm screening and binder ratio with your supplier before delivery.
- Under-compacting or skipping the second roller pass: Visible ruts and loose material underfoot. Fix: add wet steel-drum roller passes until the surface stops shifting.
- Driving on the surface too soon: Tires push material sideways before it firms up. Fix: wait the recommended cure period.
- Skipping edge restraints: Edges spread and rut without a boundary. Fix: install timber, stone, or metal edging right after compaction.
Most of these come down to patience. It's tempting to rush a driveway project, but millings punish shortcuts faster than hot-mix asphalt.
When Millings Make Sense vs. Alternatives
Millings work best when:
- Budget is the main constraint
- The driveway is rural or low-traffic
- You need a solid base under a future topcoat
They're less suited to HOA aesthetic rules or commercial traffic that needs a perfectly smooth finish.
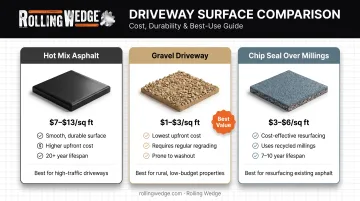
Here's how the alternatives stack up:
| Option | When It's Better | Key Trade-Offs |
|---|---|---|
| Hot Mix Asphalt | Smooth, uniform finish with professional install | Higher cost ($7–$13/sq ft installed); weeks to full structural cure |
| Gravel Driveway | Lowest upfront cost; easiest DIY option | More maintenance, dust, and potholes over time |
| Chip Seal / Tar-and-Chip Over Millings | Sealed wearing surface without full hot-mix cost | Extra install step and cost; shorter life than true asphalt |
If budget is the main driver and you compact the surface correctly, millings deliver most of asphalt’s durability at a fraction of the price. If you want a smoother finish with less ongoing maintenance, hot mix asphalt is worth the premium.
Frequently Asked Questions
Is there a way to harden asphalt millings?
Hardening comes from proper screening, correct emulsion content, layer thickness, and thorough roller compaction, not any single "hardening" product. The surface keeps strengthening over the following weeks of traffic and weather exposure.
How thick should asphalt millings be laid?
Residential driveways typically use a compacted thickness of 2-4 inches. Base layers or low spots can use 1-2 inches, while heavier-traffic areas benefit from the thicker end of that range.
How long does it take for asphalt millings to fully harden?
Millings firm up enough for light use within 24-48 hours. Full hardening under regular vehicle traffic can take several weeks, depending on weather and compaction quality.
Can you use asphalt millings without compacting them?
No. Skipping compaction leaves the material loose and prone to rutting and displacement. Rolling is what physically binds the emulsion-coated aggregate into a stable surface.
How much area will one ton of asphalt millings cover?
As a general estimate, one ton covers roughly 80-90 square feet at 2 inches thick, or around 55-60 square feet at the more common 3-inch driveway thickness. Confirm exact coverage with your supplier, since compacted density varies by material.
Do asphalt millings need to be sealed?
Sealing is optional but recommended for a harder, dust-free finish. It's typically applied as a chip seal or thin asphalt topcoat once the millings have been fully compacted.